Sunday, 26 June 2022

1:87 50ft Car

 1:87 50ft Car, is a design of Neil Ward's https://www.nwmodelworks.com/ so if you're interested in owning your own model check him out, my printer is not as high quality as Neil's so what you see shouldn't represent his fine models. Anyway, I've stripped down the details, thickened the walls & further split the roof as to be printed separately. The seats i've printed on a "floor" that is glued to the chassis and acts as a grip for the main body shell that can easily be removed since it's held only by friction. The intent is to create a train for dad and brother david's ho layouts. 1st test car shown has a more basic chassis and an early take on the bogies. The ventilators are halfway finished but glazing done. Just need wheels, couplers and maybe a pacific or light mountain chassis for the steamer to haul it.


In the early hours of the morning a second shell emerges. 

Pre abrasion therapy the second shell is pretty clean considering the cheaper abs and worn printhead.
On the third day a third shell emerged into at least slightly more light.


On the 6th day he finally got the paint colour about right. I'm upgrading my brothers 30ft van body & soon chassis as his one is rather out of scale only ever so slightly but still enough to annoy me.


Friday, 24 June 2022

1:87 Ud well wagon Download

Not quite happy with the first UD wagon, mainly with the light weight when empty. I've been meaning to do something about this for years so the result is cutting everything into sections so I can print everything flat and not rely on support material getting in the way. I've found some metal weights from an american HO wagon shell that fit lengthwise wonderfully so I omitted that section from the wagon. Under 5 hours of time @ 0.15 using cheapo ABS & $2 of printer material to print each wagon parts.

The model can be downloaded for free here https://www.thingiverse.com/thing:5449098


Had to stop myself at 3 and with only 5 ever existing it seems a shame, but onto more interesting things. Still need to add a couple minor details.


I tried printing on my UP Box small handbrake wheels, these details would be ideal to produce on a resin printer but until then they look ok from 3 feet away.
Since my brother runs some frateshi stuff I've put the frateshi couplers on 2 of the wagons that can be arranged to function as transition cars when needed.


1:87 Modern

 Showing off some more 1:87 3d printed 'closer to completed' models. The DXR chassis was redesigned to accommodate the frateshi motor block & bogies. The painting process is about to begin but still waiting on a few more diesel shells to be reprinted after alot of internal debate about true, semi scale & considerations. I guess you could call this a fine balance between what looks right and functionality. Anyway, the dxr body pictured is the third attempt and im quite happy with the result. The Ef now has correct detail but needs to be enlarged so its scale to my "frateshi format".

I also designed the Zg wagon according to a blueprint from the NZ model railway Journal october 1999 magazine using the Zh shape as a general starting point. I was handed a box of old beaten up HO stuff including a front end loader (pictured) so I quickly went about 3d printing my UD wagon with small modifications to the bogie regarding coupler mounting points.


Thursday, 16 June 2022

HO Zh Wagon Download

The Zh was todays task, 1:87 scale and coated with primer. designed to be printed on its end, vertically and the ends separately. The bogie/truck holsters will be done separately depending on the bogie.  

For those with a 3d printer and want to produce a cheap train for yourself in HO to go with the frateshi stuff then this wagon can be found here. https://www.thingiverse.com/thing:5412149

Desperately need my decal printing up and running.


Wednesday, 15 June 2022

1:87 Zp Wagon

While wondering what to use the remaining half KG of filament I think wagons for my brother couldn't hurt, and what's more NZR than a good ol ZP box car. I cut off the ends so I could print vertically and without any supports alongside the 2 end pieces, then printing 20 ventilators I glued them on one at a time. It was this point I realize I should have printed the Za, Zh or Zm, anything without the ventilators! Given the small size I found removing the parts from the "raft" created small dents, mini hide & seek adventures.. I did draw up some detail brackets, ferry hooks & smaller details but will wait for the Pla filament to arrive. Just need to organize HO bogies, decent couplers & a 0.5mm drill & wire from the good man Peter at Constellation hobbies on the Shore in Auckland.  


Saturday, 11 June 2022

More 1:87 Shells.

Showing off another 1:87 project

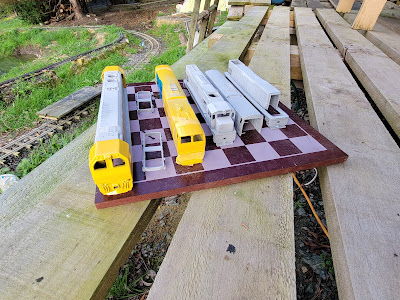
NZR Body shells for my brothers HO railway. Going to experiment with 3d printing a "Frateshi chassis" with a modified length & 3d printed universal axle extension. The larger locomotives should take a frateshi chassis while maintaining a full scale body, the exception being the track width much wider like the Frateshi nz painted HO Brazilian diesels. My aim is to remove the frateshi shell & chassis block only using the motors, bogie wheels & gear frame. I can easily 3d print a Chassis with a modified length and plug the bogies into my 3d frame, manufacture some universal shafts to accommodate any length I wish. The sideframes & can 3d print to look however I like and clip into place. Since we're not worried about wheel width the axle spacing might be a few mm +/- wrong so who cares.

Finally upgraded the phone camera thanks to a hand me down from mum so picture quality has improved over the potato camera I was using yesterday, anyway, the DL I prepared a week ago I hand brushed using the last lemon yellow & red paints. I also attempted to paint the black panda eyes free hand and without masking tape & steady hand once again a mediocre finish to a less than satisfactory finish. Thus I sanded everything back as best I could and used Tamiya Fine Primer in a light coat then polish away with 1000grit sandpaper and in a similar fashion to conditioner, repeat as necessary while avoiding sanding all the detailing away. I really need to get my AITG and organize grill etches rather than trying to 3d print them.

I'm hoping a dash 9 will fit the DL so when it arrives I'll see if my gamble pays off and it fits, if not another frateshi chassis can be modified without much issue as the motor block & flywheel comfortably fit. 


Continuing on the shells & more painting later, this current batch of 1KG ABS(Sandbrooks - Auckland) seems to have little pits are appearing on the prints, which I suspect is my very worn out print nozzle! The next filament order I will try some UP premium PLA(3D Printing Systems - auckland) with a new improved print nozzle. Instead of lemon yellow I'm trying tamiya "chrome yellow".


Garage Layout

Did some cleaning out of a recently vacated garage @ mums place now requisitioned for official railway stuff by order of management, now that the "temporary" 4 year old shelves have been re-setup Its time to consolidate the fleet from the stashes around the property, One stash being a very backbreakingly small tent in the bush next to the layout, the thrill, anxiety, dread and doubt wondering if a falling tree will crush my trains at any moment. Its a tad like lotto only you get to reassemble everything again. Luckily this did not happen. However being made of ABS and over engineered in terms of strength and thick overscale thick walls a train shell loaded with a heavy motor and batteries falling onto the concrete floor at most will scratch the paint & bend a handrail or two. 

As evident in the picture I had to double stack the trains behind each other, I've still a few locos around the country that I need to collect one day. I intend eventually to have the shelf run the length of the wall and at least a foot higher than present.

The eventual goal would be an inside loop of track running around the walls so to facilitate indoor running, with a few sidings to hold various rakes of wagons without constant uncoupling etc.


Silver Fern

Things have been rather busy in the last month, I ended up getting my hands on a 7.25" gauge silver fern that appeared on trademe. The ...