A nice before & after shot. of the Willow Creek triangle track construction & realignment program coming closer to completion.
![]() |
Before |
A nice before & after shot. of the Willow Creek triangle track construction & realignment program coming closer to completion.
![]() |
Before |
The 5 inch portland railway slowly plods along. Lots of grass cutting fun has been had. The wagons have had a coat or 2 of paint and today they ran all the way down and back without issue. Before painting I fully loaded the hopper with clay to see if the door mech could hold it which it did. Hopefully soon I can load it up with balast & get a shot or 2 of it in action.
Crossing a small drainage channel with a pallet bridge. Going to put sides on it to hold the roadbed in place. and then proceed with more clay. |
Starting off the new year properly I came into the possession of beautifully crafted aluminum track, about 200mtrs of it with all the extras, ties, fishplates, bolts & etc. I quickly set aside the track I painstakingly spent a month cutting & welding up in between servicing the printer every other couple hours when a part is completed.
I had a rough idea of a track plan to start with and had already started to cut a path so pretty quickly earth was being moved, track organized and so on.
Connecting and playing with the track gives a sensation of utter realism, everything connects without much fuss at all. I loosen all the ties first, then connect 1 track only, and then work the other track in place and then bend & align the track to your leisure, once your 40 bolt tightening's in it begins to feel like the real thing. And being Aluminum its wonderfully soft yet quite sturdy at the same time. This means however the track bed needs to be pretty sturdy otherwise its going to mess up the track when significant weight is applied. Similar to my 'Peco' 45mm track when little people accidently step on the track and deform it despite appropriate warnings.
I still wonder if I'm actually in a coma and this is all a dream. |
Going somewhere. |
A quick end of year update, & Happy new year to all.
3x 5"straight & 1x curved 2.5m sections of track is now finished, took a day or two to sort out a couple dodgy welds. The curve was a learning curve. Had to redo it in places but now is derailment free finally.
The flat wagon now runs again after the wheels rusted up over 5 years in the weather. Nothing CRC & lubrication couldn't fix. A few runs with 80+kg and its free again.
The build continues, completed the hopper doors & door release mechanism. All screwed into place and working well. I used 4mm music wire for the axles. Its not exactly scale or perfect but I think is quite durable enough for play.
Showing the complete lineup, the little 0-4-0 Polly has been reduced to just a power bogie with side-rods sitting on a rough board. The wheels on the Q wagons are slightly to large with this track, so I might attached the wheel to a power drill and file them down a touch, since the E & P wagon i've given the wheels are more scale flange. The E & P wagons also have steel bar running the entire length of the chassis so have a good amount of weight combined with the suspension results in a nice smooth & satisfying run.
Looking at the powered 'scateboard' I'm quite torn over what locomotive to build out of it, I could turn that into anything from a single fairlie through to a DL if I wanted to. I do need to sit inside it, and needs to take a large truck battery thats almost as wide as the 'scateboard'. A standard or vulcan railcar with a missing roof section?. |
Another progress update.
Finally cut up some 3mm mdf using printed the hopper parts and using them as a stencil. I 3d printed the brackets which there are 3 types to match their respective angles. Not sure why it took so long as it ended up being pretty simple. When I get some bog I will fill in the joins and give it a good sanding before the detailing goes on.
While stuck on the hopper build of the Q wagon dad gave me The Stoker magazine, issue July 1966 which has the following plan of the 3 Wheeler Coal Box wagon, since these are a local wagon its about time portland had some rolling around again, albeit reduced in scale.
The main chassis is reinforced with 3x25mm steel, giving the wagon a nice solid heavy feel to it.
At the end of day five I've now got 2 chassis and couplers of varying sizes to play with, the larger pair are far better to handle and feel quite strong enough for my needs. Now efforts are focused on the headstock area, braking & hopper.
Work on the track has come to a standstill as I try to source wood while keeping within a strict budget, although I did spend a large part of the day dismantling a wood pallet and then painfully hand sawing into the correct width.
The hopper has been sliced into 6 sections with a total build time of 25.4 hours and half a kg "ish" of material. And that's at about 3mm thickness of the walls with no rivet detail or straps etc, that I will add separately... "Yay screams the audience". So I'm further tinkering with the file to reduce this to say 1.5mm thickness to reduce print time. Which will make it rather flimsy, so.. what if I laminate it with a very thin sheet metal? then drilling holes in the appropriate places and using actual rivets, after smearing no more nails or PVA glue for permanent adhesion. I could build a hopper from scratch but it's somehow important the whole thing be 3d printed, after all with the right preparation and reinforcement ABS plastic is incredibly strong when left outdoors in the harsh UV & humid conditions of New Zealand's climate. If I did build it out of steel it would no doubt rust away after 5 years knowing my handiwork.
Day three see's the end platforms finished with hopper end cradles attached, figure before I do the hopper I should print a second wagon frame so I can play with the automatic couplers. Regarding the second frame the bearings have been altered in design to allow a 10mm Ext Dia; 5mm Int dia Bearing to be imbedded into the 3d printed bearing by press fit. I've doubled up the springs with a heavier one that snuggly fit outside the existing spring.
More wheels completed and fixed to a 3.97mm Steel axle. Hopefully tomorrow the second frame will be started/finished. 2kg of silver ABS is up next, I wanted black but this was in stock and sounded interesting enough to pursue.
More progress on the hopper wagon for the 5inch Railway, All I set out to do this weekend was weld up some track & simply expand my railway. First thing on the morning we picked up the steel I figured I would 3d print a large wheel in 1:8 scale just for fun, after it printed I realized I should print a second wheel, then I knew I needed 2 more to build a wagon. While looking up my past projects I came along the 1:24 Q3 wagon files and before I knew it I could visualize me and a rake of Q coal wagons with even a guards van running along the 5" track.
Onto the build, the main frame members are now fixed together, with 3x25mm steel bar added for weight & some stiffness. I'm going to widen the channel to allow a steel bar to neatly fit inside & running the full length of the wagon. Currently it needs 2mm shaved off the bar so we will get it on the next one. Currently printing the end flat plates, I've reduced the thickness of them to 3mm to save material. After that its onto the hopper cradle then the hopper itself, the hopper currently has presented me with a question of printing the rivets or not, if I left it a hole I could get some small rivets and install them, that would then enable me to use actual metal strapping for assembling the hopper in a prototypical way.
Getting these wheels cast in metal is becoming increasingly critical.
Recently to celebrate my recent 40th birthday my dad shouted me a couple hundred $ of steel to build and expand my 5 inch layout. With dad in tow we drove to Vulcan Steel in whangarei to purchase 3x25mm steel bar cut into 2.5mtr lengths so to fit the car. Already 8metres were cut into 25cm lengths to form the sleepers. Welding with a very old MIG welder with the highest setting it seems to be doing the job, I need to drag the ARC welder out and see if that's better suited. Yet to unpack the grinder and clean things up, blury pics taken in a very dark garage. Also need to sort out some better lighting.
In preparation for welding the track together I knew I needed a Jig of some sort, so I quickly designed handy spacers in CAD software that would friction grip and hold the track in place & 3D printed half a dozen or so, these proved the value hugely. So much so I'm printing some to hold the track in place for the turnouts & make things easier before I weld.
A "test" print of the couplers, the next pair will be twice as large. |
Axle boxes & frame with springs installed. Also, working grease doors, although I only need a small reservoir if any grease at all. |
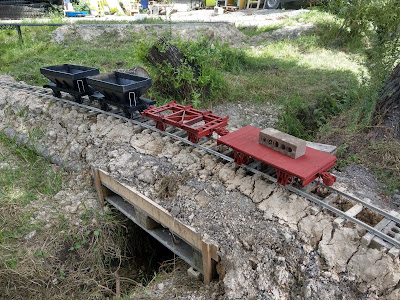
24 Hours after coming up with the Idea of printing a 1:8 Scale NZR Q wagon |
Heavy track in place, my poor back needs a brace! We had Brian from work visit and lend a hand. The first rail we managed to drag down wit...